In Flex 1,2,3 we used mx:DataGrid, which had a dg.selectedItems Object.
In Flex 4,4.5,4.6+ we now use a Spark s:DataGrid, which made dealing with selectedItems more complicated with Vectors. Jury is still out for me if going to Vectors is a good thing.

In mx, if I wanted to save selectedItems to the server, I just send dg.selectedItems to ColdFusion and looped through it. Simple.

In spark, I now have to covert the Vector back to an Object or ArrayCollection (since AMF rejects the Vector). Below is an example of how to loop through the Vector and convert it to a temp ArrayCollection to send to ColdFusion via RemoteObject/AMF.

var temp:ArrayCollection = new ArrayCollection();
var selIndices:Vector.<int> = dg.selectedIndices;
var selItems:Vector.<Object> = dg.selectedItems;
var numItems:Number = selIndices.length;
for (var i:Number = 0; i<numItems; i++){
temp.addItem(selItems[i]);
}

You want to remove all rows in an ArrayCollection where the property (e.g. parentID) = the value (eg. 5). It basically searches the entire ArrayCollection and removes all rows that meet your criteria. I needed this because I wanted to delete all children of a specific parentID. So, I made a little function to make this easy to call for any use case based on what I learned from this post http://www.actionscript.org/forums/showthread.php3?t=156163 . The trick is to only increment i if the criteria is not a match, since Flex does change the index after each item is removed. Nice trick creyenders. Thanks!

Paying it forward with a Flex function to make it easy for Flex developers to use.

public function removeItemsByPropertyValue(ac:ArrayCollection, property:String, value:String):void
			{
				for( var i : uint = 0 ; i < ac.length ; null ){
					
					var obj:Object = Object(ac[i])
					if( obj[ property ] == value ){
						ac.removeItemAt( ac.getItemIndex( obj ) );
					}else{
						i++;
					}
				}
			}

Spark DataGrid Change Cell Color

Posted: October 31, 2011 in Flex

Believe it or not, the simple task of changing a cell color when the data is changed (another cell is edited) wasn’t as easy as it might sound. Not just setting it when the grid fills up, but changing it during the course of editing the grid.  Took me a couple weeks to solve.  So, I’m passing it on to you.  Hope it saves you some time!


<s:DefaultGridItemRenderer>
<fx:Script>
<![CDATA[

override public function prepare(hasBeenRecycled:Boolean):void
{


textColor = 0x000000;

if(data){
text = data.action;

if(data.action == ’Keep’)
opaqueBackground = 0x00ff00;
else if (data.action == ’Update’){
opaqueBackground = 0xFFCC00;
}
else if (data.action == ’New’){
opaqueBackground = 0xffff00;
}
else if (data.action == ’Delete’){
opaqueBackground = 0xff0000;
}
else {
opaqueBackground = 0x000000;
}
}

}
]]>
</fx:Script>

</s:DefaultGridItemRenderer>

I was really surprised about the lack of good examples for adding a DropDownList or ComboBox inside a cell in a Flex 4.5+ spark DataGrid.  It took me awhile to figure it out.  So, I thought I’d pass it along to you.

In my scenario.  I have a ColdFusion database RemoteObject that populates and ArrayCollection that is bound to the DropDownList.  I needed to update the dataProvider of the DataGrid with two values (officeID, office) based on the DropDownList selection.  And I wanted to update the color of the cell in another column that indicates to the user that the row has been updated.  For this reason, it wasn’t as simple as using the standard ComboBoxGridItemEditor.

Below is the result.  A custom GridItemEditor that saves the new value , updates data.action to ‘Updated’, and refreshes the DataGrid’s dataProvider, which updates the background color of the action column.

Trick was overriding the save() function so I can do more when the editing is done.

Hope it helps.  Let me know if you have any questions.

<s:itemEditor>
	<fx:Component>
		<s:GridItemEditor>
			<fx:Script>
				<![CDATA[
					import mx.core.FlexGlobals;
					import mx.events.FlexEvent;
					
					import spark.events.IndexChangeEvent;


					override public function set value(newValue:Object):void {
						
						cb.selectedItem= newValue;
					}
					
					override public function get value():Object {
						return cb.selectedItem.name;
					}
					
					override public function setFocus():void {
						cb.setFocus();
					}
					
					override public function save():Boolean
					{
						data[column.dataField] = value;
						data.officeID = cb.selectedItem.ID;
						if(data.action !== 'New'){
							data.action = 'Update';
							outerDocument.flatDP.refresh();
						}
						return true;
					}
					
					
				]]>
			</fx:Script>
			
			<local:BindableDropDownList xmlns:local="*"
										id="cb" width="100%"
										height="100%"
										dataProvider="{FlexGlobals.topLevelApplication.officesDP}"
										horizontalCenter="0"
										labelFields="[name]"
										prompt="Office"
										requireSelection="false"
										valueField="name"
										verticalCenter="0"/>
			
		</s:GridItemEditor>
	</fx:Component>
</s:itemEditor>

//action column
<s:GridColumn   width="70" editable="false" headerText="Action" dataField="action">
									<s:itemRenderer>
										<fx:Component>
											<s:DefaultGridItemRenderer background="true"  backgroundColor="{data.action == 'Keep' ? 0x00ff00: data.action == 'Update' ? 0xFFCC00: data.action == 'New' ? 0xffff00: data.action == 'Delete' ? 0xff0000:0x000000}"  >								</s:DefaultGridItemRenderer>
</fx:Component>
</s:itemRenderer>
</s:GridColumn>

Need: I’ve had a long time need for an HTML WYSIWYG Editor embedded in my Adobe Flex Applications for content management.  Adobe does not provide a WYSIWYG Editor with Flex/Air and the Flex Text Layout Framework, frankly, was too confusing for me!  Some people offered components that attempted to do this in the past, like CKeditor, but they did not maintain it so that it works with Flex 4.5.1.  I decided to call on my long time friend, Adobe ColdFusion to do, as it always has, … make things easy!

GitRDone:  Leverage ColdFusion’s existing built in FCKeditor in CFTEXTAREA and Flex iFrame .  Build a simple ColdFusion page, load it into Flex via iFrame, and use Javascript to grab the HTML.  ColdFusion server required.

Source: http://www.fusionpage.com/flex/flexrta/bin/flexrta.html (view source enabled)

My solution of course was genius 🙂 … but code is very simple thanks to ColdFusion and the guys at Flex iFrame.  Appreciate it!

Here is the Flex code  and the ColdFusion code (rte.cfm).  The key was iFrame’s callIFrameFunction to bridge between actionscript and javascript to get the HTML from CF into Flex for saving to the database later when my Flex user submits the form.

Hope it helps!


<script type="text/javascript">
	
	function getText() {
		
		return ColdFusion.getElementValue('rta');
	}
	
</script>
<body>

	<cfform width="100%" height="100%" >
	<cftextarea name="rta" richtext="true"  width="600" height="600"   >
		
	</cftextarea>
</cfform>

</body>		


<fx:Script>
		<![CDATA[
			private function getTextFromFrame():void
			{
				myRtaFrame.callIFrameFunction('getText',null,getTextResult);
			}
			
			
			private function getTextResult(result : String):void
			{
				r.text = result;
			}
		]]>
	</fx:Script>
		<s:layout>
			<s:HorizontalLayout/>
		</s:layout>
		<flexiframe:IFrame  id="myRtaFrame" width="600" height="600" scrollPolicy="no" overlayDetection="true"   source="rte.cfm"/>
		<s:VGroup>
			<s:Button  label="Get HTML" click="getTextFromFrame()"/>
			<s:TextArea id="r" width="300" height="650"/>
		</s:VGroup>

Flex Mobile : DateField 4 Mobile

Posted: September 1, 2011 in Flex Mobile

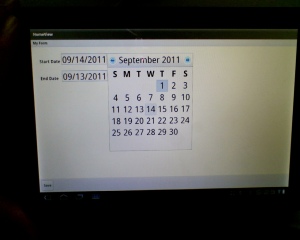
Need: Since Adobe has not yet released a spark “mobile optimized” DateField component to replace the mx:DateField component, I needed a solution fast for a touch-friendly DateField to use in my mobile tablet apps.

FlexTex GitRDone: This is my “GitRDone” workaround for now.  No custom components, No 3rd Party components.  Simple and Easy.  SOURCE FLEX PROJECT

1. I imported the mx.swc from my Flex 4.5.1 SDK into the library path of my Flex Mobile Project.  This is a back door to using mx inside a Mobile Project, which does not include the mx.swc . I added the mx namespace in my View.

2. Then, thanks to Peter Dehaan over at http://blog.flexexamples.com/ for examples on skinning mx:DateField, I changed the style  to make it more touch-friendly.  Increased the size of the calendar icon and the next/previous month icon.  I also increased the fontSize so the dates were big enough to select with finger.

3.  I tested it on the Xoom and the Acer Iconia tablets. Works great!  Here is how it looks on Motorola Xoom.

<?xml version="1.0" encoding="utf-8"?>
<s:View xmlns:fx="http://ns.adobe.com/mxml/2009" xmlns:mx="library://ns.adobe.com/flex/mx" 
		xmlns:s="library://ns.adobe.com/flex/spark" title="HomeView">
	
	<fx:Script>
		<![CDATA[	
			import mx.controls.DateChooser;
			
		]]>
	</fx:Script>
	
	
	<fx:Style>
		@namespace s "library://ns.adobe.com/flex/spark";
		@namespace mx "library://ns.adobe.com/flex/halo";
		@namespace components "components.*";
		
		.dfStyle
		{
			skin: Embed("calendarIcon48x48.png");
			upSkin: ClassReference(null);
			overSkin: ClassReference(null);
			downSkin: ClassReference(null);
			disabledSkin: ClassReference(null); 
		}
		
			.myDateChooserStyles {
				/* Previous Month */
			prevMonthUpSkin: Embed("touchButtonLeft.png");
			prevMonthOverSkin: Embed("touchButtonLeft.png");
			prevMonthDownSkin: Embed("touchButtonLeft.png");
			prevMonthDisabledSkin: Embed("touchButtonLeft.png");
			
			/* Next Month */
			nextMonthUpSkin: Embed("touchButtonRight.png");
			nextMonthOverSkin: Embed("touchButtonRight.png");
			nextMonthDownSkin: Embed("touchButtonRight.png");
			nextMonthDisabledSkin: Embed("touchButtonRight.png");
		}
		
		
	</fx:Style>
	<s:Panel title="My Form" width="100%" height="100%">
		<s:VGroup paddingRight="10" paddingLeft="10" paddingTop="10" paddingBottom="10" width="100%" height="100%">
		<s:Form>
		<s:FormItem  label="Start Date" fontSize="20">
			<mx:DateField id="date1"  interactionMode="touch" styleName="dfStyle" dateChooserStyleName="myDateChooserStyles"   fontSize="40" height="48" />
		</s:FormItem>
		<s:FormItem   label="End Date" fontSize="20">
			<mx:DateField id="date2"  styleName="dfStyle" dateChooserStyleName="myDateChooserStyles"   fontSize="40" height="48" />
		</s:FormItem>
		</s:Form>
		</s:VGroup>
		<s:controlBarContent>
			<s:Button label="Save" height="50"/>
		</s:controlBarContent>
	</s:Panel>
	
</s:View>

Want to grab your current GPS location, display it on a map and update the location as the device moves?
I took the basic example off of TourDeFlex and applied it to the new MapQuest Mobile Flash API.
I went with MapQuest Mobile because of the performance issues of Google Maps Flash API and Adobe Air.
Mapquest is working great for me and their developers are very responsive!
Works on Motorola Xoom, Acer Iconia, Blackberry Playbook, and iPad.
Here is my source code that in live on my Tablet apps.

<?xml version="1.0" encoding="utf-8"?>
<s:Group xmlns:fx="http://ns.adobe.com/mxml/2009" xmlns:tilemap="com.mapquest.tilemap.*"  creationComplete="initApp()" 
		 xmlns:s="library://ns.adobe.com/flex/spark" xmlns:mx="library://ns.adobe.com/flex/mx"	width="100%" height="100%">
	<fx:Declarations>
		
	</fx:Declarations>
	
		<fx:Script>
			<![CDATA[
				import com.mapquest.Config;
				import com.mapquest.LatLng;
				import com.mapquest.mobile.GPS;
				import com.mapquest.tilemap.*;
				import com.mapquest.tilemap.controls.DefaultControlSet;
				import com.mapquest.tilemap.controls.shadymeadow.SMViewControl;
				import com.mapquest.tilemap.controls.shadymeadow.SMZoomControl;
				import com.mapquest.tilemap.pois.Poi;
				
				import flash.sensors.Geolocation;
				
				import mx.effects.easing.Circular;
				import mx.effects.easing.Elastic;
				
				import spark.components.View;
				import spark.events.ViewNavigatorEvent;
				
				
				private var isPinching:Boolean;
				private var currentCenter:LatLng;
				private var zoomControl:SMZoomControl;
				private var viewControl:SMViewControl = new SMViewControl();
				
				private var zs:ZoomSettings;
				
				import com.mapquest.*;
				import com.mapquest.mobile.GPS;
				import com.mapquest.mobile.TextUtil;
				import com.mapquest.tilemap.*;
				import com.mapquest.tilemap.pois.*;
				
				import mx.events.ResizeEvent;


				include "Config.as";
				
				
				[Bindable]
				public var map:TileMap;
				protected var g:Geolocation = new Geolocation();   
				public var gps:GPS;
				
				public var gpsSupported:Boolean;
				
				public var currentLatLng:LatLng = new LatLng(38.134557, -98.4375);
				//public var currentLatLng:LatLng;
				
				public var textUtil:TextUtil;
				
				private var gpsPoi:Poi;
				private var counter:Number = 0;
				
				private function initApp():void {
					makeMap();
					
					if (Geolocation.isSupported)
					{
						
						latitude.text = "Finding Location...";
						g.addEventListener(GeolocationEvent.UPDATE, onUpdate);
						addEventListener(ViewNavigatorEvent.REMOVING,onRemove);
					}
					else
					{
						
						latitude.text = "Geolocation is not supported on this device.";
					}    
					
					
					gps = new GPS();
					textUtil = new TextUtil();
					
					if (gps.isSupported) {
						gpsSupported = true;
						
					}
					else {
						this.gps = null;
					}


					this.addEventListener(ResizeEvent.RESIZE,this.onResize);
					
				}
			
				protected function onUpdate(event:GeolocationEvent):void
				{
					trace("Update event called");
					
					
					if(event.latitude){
						
						var ll:LatLng = new LatLng(event.latitude,event.longitude);
						currentLatLng = ll;
						latitude.text = event.latitude.toString();
						longitude.text = event.longitude.toString();
						counter = counter+1;
						
						gps.getCurrentLocation();
						
						if(gps.currentLatLng){
							currentLatLng = gps.currentLatLng;
						}
						else {
							currentLatLng = ll;
						}
						
						
						if(counter == 1){
							setPoi();
						}
						else {
							
							gpsPoi.latLng = currentLatLng;
						}
						
						
					}


				}
				
				private function setPoi():void {
					
					gpsPoi = new Poi(currentLatLng)
					gpsPoi.infoWindowTitleText = "Current Location";
					gpsPoi.infoContent = "LatLng: " + this.gpsPoi.latLng.toString();
					
					map.setCenter(currentLatLng,mapStartZoomLevel);	
					map.addShape(gpsPoi);
				}
				
				protected function onRemove(event:ViewNavigatorEvent):void
				{
					g.removeEventListener(GeolocationEvent.UPDATE, onUpdate);                
				}
				
				private function onResize(e:ResizeEvent):void {
					this.map.size = new Size(this.width,this.height);
				}
				
				
				private function makeMap():void {
					
					map = new TileMap(key,mapStartZoomLevel,currentLatLng,mapStartType);
					
					map.size = new Size(uic.width,this.uic.height);
					uic.addChild(map);
					map.mapFriction = mapFriction;
					
				}
					
				
			]]>
		</fx:Script>


	<mx:UIComponent id="uic" width="100%" height="100%" x="0" y="0"/>
	
	<s:HGroup top= "60" left="60">
		<s:Label text="Latitude:" color="0xffffff"/>
		<s:Spacer width="5" />
		<s:Label id="latitude" color="0xffffff"/>
		<s:Spacer width="50"/>
		<s:Label text="Longitude:" color="0xffffff"/>
		<s:Spacer width="5"/>
		<s:Label id="longitude" color="0xffffff"/>
		
	</s:HGroup>
	
</s:Group>

If you want to save something to external storage ( SD Card, USB) … A little thing you might miss.

In your App.xml file, you have uncomment this line in the Android Manifest .

<uses-permission android:name="android.permission.WRITE_EXTERNAL_STORAGE"/>

In Texas, we have a lot of Oil and Gas Facilities both onshore and offshore.  They leak Green House Gases (GHG). One of my clients provides tools for testing and reducing GHG.  I built a Flex Mobile tablet application for them to take into the field.  It stores data offline since they don’t always have an internet connection.

Challenge was: What do you do if you drop the tablet on the rig and it smashes?  Do you lose all the test data captured on the tablet?  The solution I came up with is to copy the offline data stored on the device onto the SD card.  This would allow them to be able to move the data onto their backup tablet and continue on with the testing using the new device.

This function copies the Local SharedObject, that stores the offline data, onto the SD Card.


public function soToSD():void {

var soOnSD:File = File.documentsDirectory.resolvePath("mGHG.sol");

var soDir:String = File.applicationStorageDirectory.resolvePath("#SharedObjects").nativePath;

var soInAppStorage:File = new File(soDir);

soInAppStorage = soInAppStorage.resolvePath('mGHG2.swf/mGHG.sol');

soInAppStorage.copyTo(soOnSD, true);

var files:Array = File.documentsDirectory.getDirectoryListing();

for (var i:uint = 0; i &lt; files.length; i++) {

trace(files[i].nativePath);

}

}